背景目的 随着金融,医疗,政企对网络延迟的高要求,云原生提出多网卡,实现高低延迟流量的分离处理。
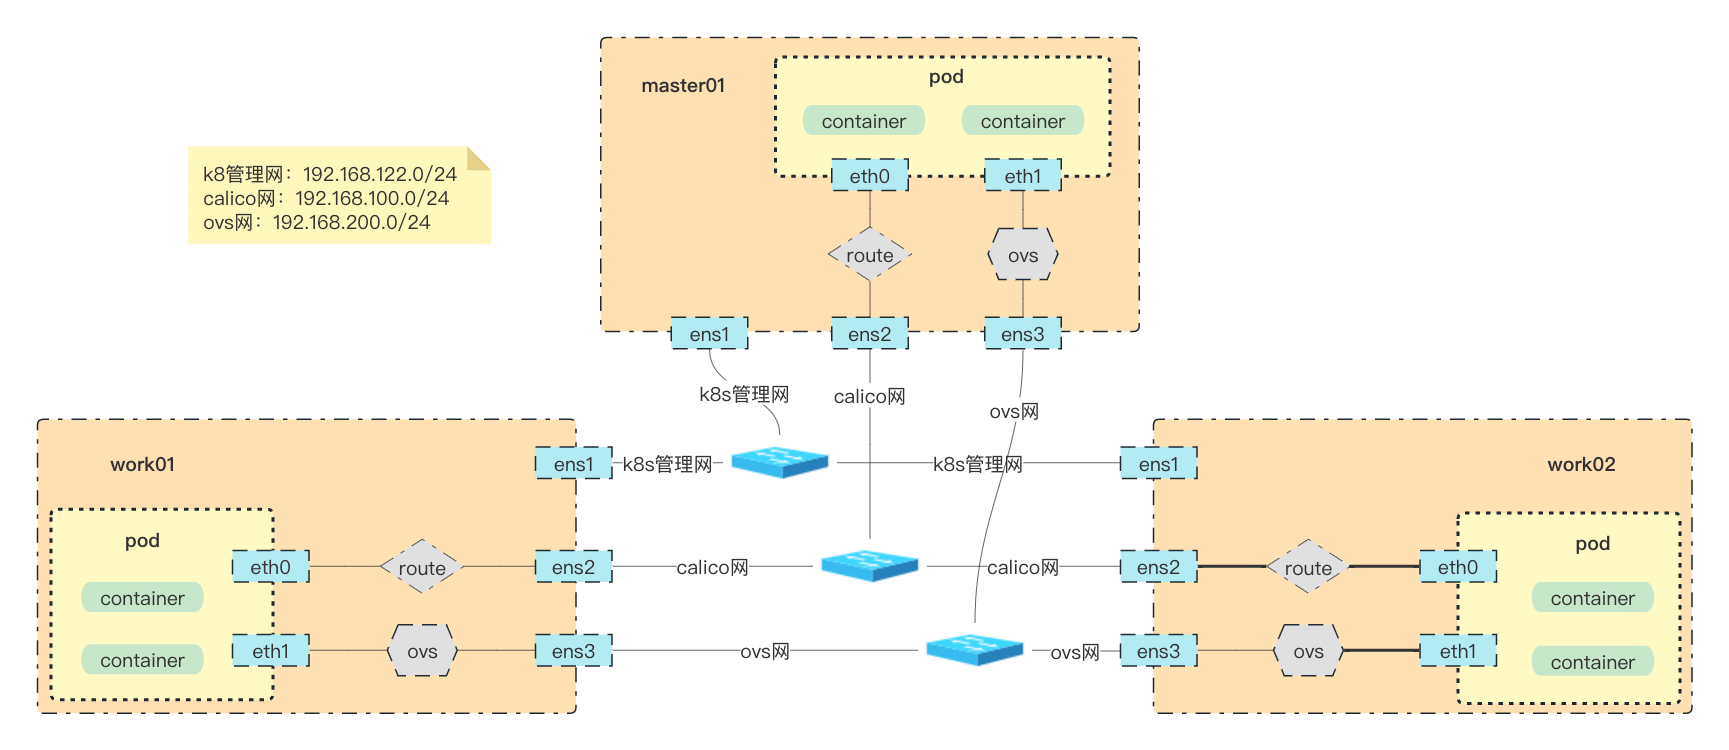
方案架构:
Calico作为默认网络,承载管理流量与非低延时业务流量;
OVN-Kubernetes作为第二网络,承载低延时业务流量;
组网架构 节点ip规划
work01:
work02:
环境搭建 calico 搭建 calico 简介
这里介绍calico Underlay 网络的bgp 的模式:
Full-mesh
Route reflectors
Top of Rack(ToR)
这里测试环境使用calico bgp 模式中的 Route reflectors(rr)方式
calico 创建
1
2
3
4
5
6
7
8
9
10
11
12
13
14
15
16
17
18
19
20
21
22
23
24
25
26
27
28
29
30
31
32
33
wget -c https://raw.githubusercontent.com/projectcalico/calico/v3.24.5/manifests/calico.yaml CALICO_IPV4POOL_IPIP = "Never" IP_AUTODETECTION_METHOD = "ens2" CALICO_IPV4POOL_CIDR = "10.244.0.0/16" CALICO_IPV4POOL_BLOCK_SIZE = "24" envFrom: - configMapRef: name: kubernetes-services-endpoint optional: true cat > kubernetes-services-endpoint.yaml <<EOF apiVersion: v1 data: KUBERNETES_SERVICE_HOST: 192.168.122.10 KUBERNETES_SERVICE_PORT: "6443" kind: ConfigMap metadata: name: kubernetes-services-endpoint namespace: kube-system EOF kubectl apply -f kubernetes-services-endpoint.yaml kubectl apply -f calico.yaml kubectl apply -f https://raw.githubusercontent.com/projectcalico/calico/v3.24.5/manifests/calicoctl.yaml
calico rr 模式
选择master01 作为rr节点
1 2 3 4 5 6 7 8 kubectl label node master01 router-reflector=true calicoctl get node master01 -o yaml > master01.yaml calicoctl apply -f master01.yaml
修改master01.yaml 信息
1
2
3
4
5
6
7
8
9
10
11
12
13
14
15
16
17
18
19
20
21
22
23
24
25
26
27
28
29
30
31
32
33
34
35
apiVersion: projectcalico.org/v3 kind: Node metadata: annotations: projectcalico.org/kube-labels: '{"beta.kubernetes.io/arch":"amd64","beta.kubernetes.io/os":"linux","kubernetes.io/arch":"amd64","kubernetes.io/hostname":"master01","kubernetes.io/os":"linux","node-role.kubernetes.io/control-plane":"","node-role.kubernetes.io/master":"","node.kubernetes.io/exclude-from-external-load-balancers":"","route-reflector":"true"}' creationTimestamp: "2022-12-22T10:27:22Z" labels: beta.kubernetes.io/arch: amd64 beta.kubernetes.io/os: linux kubernetes.io/arch: amd64 kubernetes.io/hostname: master01 kubernetes.io/os: linux node-role.kubernetes.io/control-plane: "" node-role.kubernetes.io/master: "" node.kubernetes.io/exclude-from-external-load-balancers: "" route-reflector: "true" name: master01 resourceVersion: "3402273" uid: 60f03e30-b16f-44d7-92c4-97fcbc1c98a5 spec: addresses: - address: 192.168 .100 .10 /24 type: CalicoNodeIP - address: 192.168 .122 .10 type: InternalIP bgp: asNumber: 63400 ipv4Address: 192.168 .100 .10 /24 routeReflectorClusterID: 192.168 .100 .10 orchRefs: - nodeName: master01 orchestrator: k8s status: podCIDRs: - 10.244 .0 .0 /24
更改bpg config 信息
1 2 3 4 5 6 7 8 9 10 11 12 13 14 15 16 17 18 19 20 21 22 23 24 25 26 cat > bgpconfig.yaml << EOF apiVersion: projectcalico.org/v3 kind: BGPConfiguration metadata: name: default spec: logSeverityScreen: Info nodeToNodeMeshEnabled: false # 关闭 bgp full-mesh 模式 asNumber: 63400 # 同master01 节点一样设置 as号 EOF cat > peer.yaml << EOF apiVersion: projectcalico.org/v3 kind: BGPPeer metadata: name: peer-to-rrs spec: nodeSelector: all() # 选择所有node节点启用bgp peerSelector: route-reflector == 'true' # 选择route-reflector=true的标签master01节点作为rr节点,下发路由信息 EOF calicoctl apply -f bgpconfig.yaml calicoctl apply -f peer.yaml
查看calico bgp信息
1 2 3 4 5 6 7 8 9 10 11 12 13 14 15 16 17 18 19 20 21 22 23 24 25 26 27 28 29 30 31 calicoctl node status Calico process is running. IPv4 BGP status +-----------------+---------------+-------+------------+-------------+ | PEER ADDRESS | PEER TYPE | STATE | SINCE | INFO | +-----------------+---------------+-------+------------+-------------+ | 192.168.100.101 | node specific | up | 2023-01-16 | Established | | 192.168.100.102 | node specific | up | 2023-01-16 | Established | +-----------------+---------------+-------+------------+-------------+ IPv6 BGP status No IPv6 peers found. calicoctl node status Calico process is running. IPv4 BGP status +----------------+---------------+-------+------------+-------------+ | PEER ADDRESS | PEER TYPE | STATE | SINCE | INFO | +----------------+---------------+-------+------------+-------------+ | 192.168.100.10 | node specific | up | 2023-01-16 | Established | +----------------+---------------+-------+------------+-------------+ IPv6 BGP status No IPv6 peers found.
multus-cni 创建 1 2 3 4 5 6 7 8 9 10 11 12 13 wget -c https://raw.githubusercontent.com/k8snetworkplumbingwg/multus-cni/v3.9.3/deployments/multus-daemonset.yml envFrom: - configMapRef: name: kubernetes-services-endpoint optional: true kubectl apply -f multus-daemonset.yml
ovn-k8s 创建 配置ovn-deamonset
1 2 3 4 5 6 7 8 9 10 11 12 13 14 $ cd $HOME /ovn/ovn-kubernetes/dist/images ./daemonset.sh --image=yusur/ovn-daemonset-f:fullmode --net-cidr=10.144.0.0/16 --svc-cidr=10.96.0.0/16 --gateway-mode="local" --gateway-options="--gateway-interface=ens3 --gateway-nexthop=192.168.200.1" --k8s-apiserver=https://192.168.200.10:6443 --multicast-enabled --disable-snat-multiple-gws --disable-pkt-mtu-check=true $ kubectl create -f ../yaml/ovn-setup.yaml $ kubectl create -f ../yaml/ovnkube-db.yaml $ kubectl create -f ../yaml/ovnkube-master.yaml $ kubectl create -f ../yaml/ovnkube-node.yaml
查看ovn和ovs 信息
1 2 3 4 5 6 7 8 9 10 11 12 13 14 15 16 17 18 19 20 21 22 23 24 25 26 27 28 29 30 31 32 33 34 35 ovs-vsctl show 6e79b5ed-12e9-438a-b5ce-dd37f8aa20bc Bridge brens3f2 fail_mode: standalone Port patch-brens3f2_master01-to-br-int Interface patch-brens3f2_master01-to-br-int type : patch options: {peer=patch-br-int-to-brens3f2_master01} Port ens3f2 Interface ens3f2 Port brens3f2 Interface brens3f2 type : internal Bridge br-int fail_mode: secure datapath_type: system Port ovn-f70ac1-0 Interface ovn-f70ac1-0 type : vxlan options: {csum="true" , key=flow, remote_ip="192.168.122.101" } Port ovn-k8s-mp0 Interface ovn-k8s-mp0 type : internal Port br-int Interface br-int type : internal Port patch-br-int-to-brens3f2_master01 Interface patch-br-int-to-brens3f2_master01 type : patch options: {peer=patch-brens3f2_master01-to-br-int} Port ovn-5ae586-0 Interface ovn-5ae586-0 type : vxlan options: {csum="true" , key=flow, remote_ip="192.168.122.102" } ovs_version: "2.17.3"
使用方法 配置第二network 1 2 3 4 5 6 7 8 9 10 11 12 13 14 15 16 17 18 19 20 21 22 cat >yuser-ovn.yaml <<EOF apiVersion: "k8s.cni.cncf.io/v1" kind: NetworkAttachmentDefinition metadata: name: yusur-ovn #网络名称 namespace: default spec: config: '{ "cniVersion": "0.4.0", "name": "ovn-kubernetes", "type": "ovn-k8s-cni-overlay", "ipam": {}, "dns": {}, "logFile": "/var/log/ovn-kubernetes/ovn-k8s-cni-overlay.log", "logLevel": "5", "logfile-maxsize": 100, "logfile-maxbackups": 5, "logfile-maxage": 5 }' EOF kubectl apply -f yuser-ovn.yaml
使用第二network 1 2 3 4 5 6 7 8 9 10 11 12 13 14 15 16 17 18 19 20 21 22 23 24 cat >busybox3.yaml <<EOF apiVersion: v1 kind: Pod metadata: name: busybox3 namespace: default annotations: k8s.v1.cni.cncf.io/networks: '[{ "name": "yusur-ovn", #指定网络名称 "interface": "eth1", #必须指定eth0 以外的名称,不然和calico网卡冲突 "default-route": ["10.144.0.1"] #必须指定默认路由信息,不然无法创建,默认路由和calico冲突无法启动pod }]' spec: containers: - image: busybox:1.28 command: ['/bin/sh', '-c', 'sleep 36000'] imagePullPolicy: IfNotPresent name: busybox restartPolicy: Always nodeSelector: kubernetes.io/hostname: work01 EOF kubectl apply -f busybox3.yaml
查看多网卡信息 1 2 3 4 5 6 7 8 9 10 11 12 13 14 15 16 17 18 19 20 21 22 kubectl exec -it busybox3 -- ip addr 1: lo: <LOOPBACK,UP,LOWER_UP> mtu 65536 qdisc noqueue qlen 1000 link /loopback 00:00:00:00:00:00 brd 00:00:00:00:00:00 inet 127.0.0.1/8 scope host lo valid_lft forever preferred_lft forever 3: eth0@if8011: <BROADCAST,MULTICAST,UP,LOWER_UP,M-DOWN> mtu 1500 qdisc noqueue link /ether c6:06:25:b7:76:48 brd ff:ff:ff:ff:ff:ff inet 10.244.83.250/32 scope global eth0 valid_lft forever preferred_lft forever 5: eth1@if8012: <BROADCAST,MULTICAST,UP,LOWER_UP,M-DOWN> mtu 1400 qdisc noqueue link /ether 0a:58:0a:90:00:1f brd ff:ff:ff:ff:ff:ff inet 10.144.0.31/24 brd 10.144.0.255 scope global eth1 valid_lft forever preferred_lft forever kubectl exec -it busybox3 -- ip route default via 10.144.0.1 dev eth1 10.96.0.0/16 via 10.144.0.1 dev eth1 10.144.0.0/24 dev eth1 scope link src 10.144.0.31 10.144.0.0/16 via 10.144.0.1 dev eth1 169.254.1.1 dev eth0 scope link